Useable images from a pinhole camera
using photographic paper
Specification

| Manufacturer | : | Kirsty Hartley |
|---|---|---|
| Produced | : | 2021 |
| Classification | : | Medium Format Pinhole |
| Body Type | : | Box |
| Construction | : | Cardboard |
| Film Type | : | Sheet Film |
| Film Width | : | 110mm |
| Image Size | : | 14 x 10 cm |
| No. of Images | : | 1 |
| Lens Type | : | Pinhole |
| Focus Type | : | Fixed |
| Focal Length | : | 180mm |
| Focal Range | : | Universal |
| Aperture Type | : | Pinhole |
| Pinhole diameter | : | 0.34 |
| Aperture | : | f/524 |
| Shutter Type | : | Manual |
| Shutter Speeds | : | Longer than 0.5 second |
| Size (w x h x d) | : | 125 x 155 x 187 mm |
| Weight | : | 155g |
Making a Pinhole camera
I do not intend to go through the process of making a pinhole camera because there are many good designs on the internet. But, the qualities you will need for a successful camera are:-
- The box/container needs to be light tight. Take particular attention to the seal around the door.
- The hole should be circular and punched in thin aluminium or aluminium foil. Any burrs should be removed. Laser cut pinholes can also be purchased.
- An easy method of opening and closing the pinhole needs to be provided.
- The hole size should be chosen in relation to size of camera.
Getting the right exposure
Many web pages on the internet that deal with pinhole cameras suggest that exposure is a case of trial and error. Although there are variables that are difficult to control, it's a good idea to get a ballpark figure for exposure as a starting point. The only real variable is the equivalent ISO of the photographic paper you use. Everything else lends itself to accurate calculations.
Hole Size
The optimum hole size will depend on the cameras focal length. The focal length (f) of a pinhole camera is distance from pinhole to image plane.
Up to a certain point, the smaller the hole, the sharper the image. But when the hole is very small the image becomes less clear. This is caused by defraction effects due to the wave properties of light.
A method of calculating the optimal pinhole diameter was first attempted by Jozef Petzval in the late 1800s. The formula for pinhole size to produce the sharpest image was found to be:-
d=2√(fλ)
where d is pinhole diameter, f is focal length and λ is the wavelength of light.
Most papers are sensitive to light in the green/blue zone with a peak sensitivity around 525nm. Putting in the numbers and doing a bit of transposition we get a simple formula of:-
d = (√525f )/500 ≅ ( √f )/22
where d and f are in mm.
If you make your hole larger than this, the image will be less clear but you will shorten your exposure times. Shorter exposure times might give some benefit.
If you make your hole smaller than this, the image will again be less clear but you will lengthen your exposure times. This will provide little benefit.
The f-number of the aperture
Knowing the f-number(N) of the aperture(hole) is important for working out exposure times. The value of N is calculated by dividing the focal length by the diameter of the pinhole.
N = f/d
where f is focal length and d is pinhole diameter.
For a camera with a optimal size hole the f-number will be 22√f.
where f is in mm.
Maximum value of the f-number for a normal camera is up to about 32. For pinhole cameras, the f-number may be much higher, possibly between 200 and 600.
Measuring pinhole size
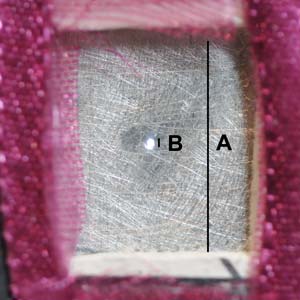
Close up of pinhole
Use a digital camera/phone to take a close up picture of the pinhole. Make sure the pinhole is in focus. Then, view the image on the digital camera/phone, or better still on a computer. Expand the image to make it easier to measure accurately. On the screen, measure the pinhole diameter(B) and another distance that would be easy to measure on the actual pinhole camera(A). Measure the equivalent distance of 'A' on the actual pinhole camera(C)
The size of the pinhole is calculated as B.(C/A).
Example
I took an image of the pinhole and viewed it on my computer. 'A' was 160mm, 'B' was 5mm and the equivalent distance to A on the actual camera(C) was 11mm. The actual pinhole diameter was therefore 5x(11/160) = 0.34mm. The f-number is focal length divided by the pinhole diameter which is 180/0.34 = 524.
Exposure Times
The exposure time can easily run into several minutes. It will depend on the ISO(speed) of the paper used, the f-number(N) and the lighting conditions.
On a Sunny day
To get some idea of the timings, lets assume it is a sunny summers day. Using the Sunny 16 Rule we can calculate the exposure time required using:-
t = (1/ISO).(N/16)2 seconds
The ISO for Ilford Multigrade Paper is quoted as between 3 and 6. Evidence from users suggests the 6 is a good estimate. So let's use 6. The value of N for a typical pinhole camera is probably about 250. So time required for an exposure on a sunny day is:-
t = (1/6).(250/16)2 seconds = 41 seconds.
For the Hartley camera above, having an N value of 524, the time required for an exposure on a sunny day is:-
t = (1/6).(524/16)2 seconds = 179 seconds = 2 minutes 59 seconds.
If it is slightly overcast, with shadows that are soft around the edges, then double the time.
Using an Exposure Meter
If your camera is not pointing at an object in full sun, you can use a light meter. However, it is unlikely that the scale of the meter will go as far as f/524 for instance. The maximum value may be more like f/22.
To use the meter, set the ISO to the ISO of the paper(6), set the f-number to say f/16. The exposure time for the camera will be given by:-
t = (meter reading).(N/16)2.
Similarly, if you have set the aperture value on the meter to f/22, then the exposure time for the camera will be given by:-
t = (meter reading).(N/22)2.
For example
Assuming the equivalent ISO for the film paper is 6. Set the ISO on the meter to 6. Set the aperture value to f/16. If the meter shows an exposure time of 1/4 second and the N value of the camera is 250, then the exposure time for the camera is:-
t = (1/4).(250/16)2 = 61 seconds.
Reciprocity Failure
Those of you that are used to using negative film may be aware of reciprocity failure. You have to compensate for the non-linear characteristics of the film for shutter times of more that 1 second. According to Ilford's specifications for its paper film, its paper film does not suffer from this and can be ignored.
Good Luck
Image taken with this camera

Taken on a sunny day using the sunny 16 rule for calculating exposure time. Exposure time was 3 minutes. I am fuzzy because I couldn't keep completely still for 3 minutes. Arbour is quite sharp.
- Film used was Ilford Multigrade IV RC Delux Pearl Sheets.
- Developed for 1 minute in Ilford Multigrade Developer.
- Ilfostop stop bath for 1 minute.
- Fixed for 5 minutes in Adox Adofix P II.

Photograph scanned on Epson V550 scanner.
Ilford Multigrade produces a negative image. Negative image inverted and flipped horizontally using photoshop. No other procedures carried out.