Producing 127 film from any 120 Film
Any 120 film can be cut down to 127 size by using a home built slicing block. You will also need some 127 backing paper which can be sourced in several ways. To make your own backing paper from 120 backing paper, click here: Producing 127 backing paper from 120 backing paper.
The Slicing Device
You will require a device for cutting the 120 film to 127 size. This can be made with blocks of wood, a safety razor, some screws and a piece of felt.
This slicing device will produce 127 size film as well as 16mm film. Here are some images to show you how its made:-


Dimensions
The most important part is to get the width of the blocks correct!
The film sizes are as follows:-
120 Film : Width = 62mm, Length 815mm.
127 Film : Width = 46mm, Length 650mm.
I am hoping the construction of the slicer is self explanatory from the images. It is basically two lower blocks with a safety razor sandwiched between them and two side pieces. The upper block is held in place loosely by screws in some slots so that it can easily be removed to load the film. Felt is stuck to the surfaces to stop scratching of the film. The upper block needs a thin slot in it to take the blade.
Preparing
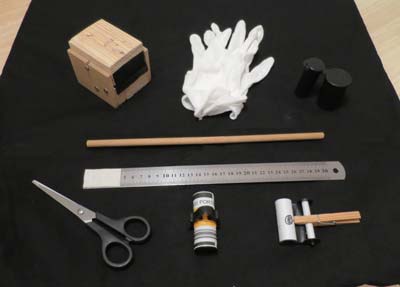
You will need:-
- The cutting block
- A roll of 120 film
- A piece of 127 backing paper
- Masking tape or Sellotape or Scotch tape
- Scissors.
- Cotton gloves (optional)
- A 127 spool
- A black 127 film canister
- A black 35mm film canister
- A measuring stick or something exactly 32.5cm long.
- Clips like clothes pegs.
- Dark room or changing bag.
You will need a roll of 127 backing paper. You can source 127 backing paper by buying an expired roll of film or by making it yourself. You will see that the backing paper is marked as to where the film starts and ends. Measure the length of film required. If it's not obvious, the film needs to start about 8.5cm before the number 1 on the 8 exposure record and finish about 7.5cm after the number 8 on the 8 exposure record. It will be about 65cm. Get a measuring stick 65cm long for the darkroom. If you will be working in a changing bag then a stick 32.5 cm will be better. Get some sticky tape that is 1 or 2mm shorter than the width of the film and fix it to something that will protect it but will be able to be removed easily. This tape will be used to attach the film to the backing paper.

Roll the 127 backing paper onto a spool so that the 'exposed' marked end is free. Now start rolling the backing paper tightly onto the other spool until you reach the 'end of film' marker. Put a clip/peg on this at this point to stop it unwinding. Cut the gummed paper on the 120 film and perhaps put on a clip to stop it unwinding.
Put all of the above listed components into the changing bag or turn out the light in your darkroom.
The Procedure
The following procedures must be carried out in complete darkness!
Using the cotton gloves (optional), carefully unroll the 120 film backing paper and detach the film from it. Open the cutting block and place the film in it, leaving just sufficient to be able to pull it. Put the top on the cutting block. Pull the film though the block a short way and cut off the attached end of the film, leaving sufficient to be able to pull the rest through. Make this cut as square as possible. Pull through the rest of the film by holding on to the widest part. You will now have a length of 127 film. Cut it to exactly to the length required 65cm (i.e. 2 x 32.5cm) long using your measuring stick as a guide. Cut it as square as possible. Roll up the 16mm film that has been cut off and place it into the black 35mm film canister for later use.
Feed one end of the 127 film into the prepared spool and start winding it up. You must get the film and backing paper parallel before you start winding. Continue to wind carefully, without touching the film except at the sides. Every few turns, pull the film and backing paper gently to ensure it is tight on the spool. When you get to the end of the film, take the sticky tape off the protective strip and carefully stick the film to the backing paper so it lies flat. Continue to roll until you get to the start of the backing paper. Put a clip on the spool to stop it unravelling. Turn on the lights or open the changing bag.
Take the clip off the spool and replace it with some tape to keep the spool tight. Label the spool with the type of film you used! Put your new film in a 127 canister or wrap in silver foil.
Job Done - Actually not quite as easy in the dark. If you have some old 120 film, you may want to have a practice in the light first.
Using the film
It is important to realise that the film you have prepared will not be wound as tightly a commercially produced film. Store, load and unload your film in much reduced light to avoid light leaks. You should also note that the film has to be wound tighter on the 127 spool than the 120 spool it came from. This gives it a tendency to unravel if not held tight at all times!
Good Luck