Conversion of 616 film cameras to 120
Issues to Solve
There are four issues to solve for this conversion:-
- Getting 120/620 film/spools to fit 616 cameras
- Making a mask for the film
- Adjusting the viewfinders
- Devising a system for advancing the film by the correct amount
Overview of the two films
| Film Number | Number of Exposures | Frame Size Inches | Frame Size cm |
|---|---|---|---|
| 616 | 8 | 2½ x 4¼ | 6.5 x 11 |
| 616 | 12 | 2½ x 2½ | 6.5 x 6.5 |
| 616 | 16 | 2½ x 2⅛ | 6.5 x 5.5 |
| 120 | 8 | 2¼ x 3¼ | 6 x 9 |
| 120 | 12 | 2¼ x 2¼ | 6 x 6 |
| 120 | 16 | 2¼ x 1⅝ | 6 x 4.5 |
Getting 120 film/spools to fit 616 cameras
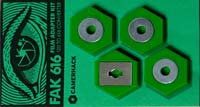
The main problem is ensuring a light tight fit on the take up spool so that the film can be unloaded in subdued light. There are 3 solutions:-
The first and most convenient is to buy spool adaptors from somewhere like Camerhack. The 120 spools will fit directly into the camera with an adapter at each end.

Another solution is to combine a metal 616 spool with a metal 120 spool. Cut the ends off a 616 spool leaving 3.5mm spigot. Then, carefully glue them to the 120 spool using quick setting epoxy like Araldite Rapide. Don't forget to ask for your spool back when the film is being developed.
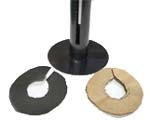
A third way is to produce a series of cardboard, felt or foam shims. These shims are added to the spool to a depth of 4mm on each side. The final shim should be black cardboard or plastic. The shims are secured with black electrical tape across the joins. Make sure the tape across the shim nearest the film is on the back to avoid snagging. This is the least successful of the three methods.
In each case, it is best to test the system with an old exposed roll of 120 film in the camera.
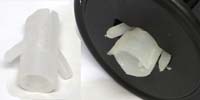
For the film feed side, the spool adaptors are ideal but a trip to the nearest hardware store will enable you to find some wall plugs to fit the spool. The plugs should project by 4mm from the spool. Just one thing to look out for. If the film tensioner springs bear on the spools and not the film, this last method may not be successful.
Film Mask
There are two popular mask types:-
The first simply supports the film as it transfers across the back of the camera, and the second provides a smaller defined and controlled area for the image.
The Panoramic Mask
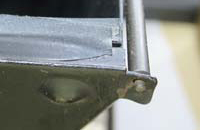
The panoramic mask simply reduces the width of the aperture to the size of the 120 film to give some support to keep it flat. Simply cut some 0.7mm plastic sheet about 108mm long by 3.5mm wide and attach it using black electrical tape to the existing film runners. Trim the length and chamfer the end so it rests on the cross frame to give support without fouling the rollers. This method gives 5 'panoramic' negatives of 4¼" by 2¼" (11 x 6 cm).
Mask to get 15 images from 120 film
I presume you are practical so I will simply ask you to cut out this mask from black card. Score along a line between the main mask and the trapezoidal tabs and bend back the tabs. Insert the tabs under the rollers at each end of the film plane and secure with black electrical tape. The mask should fit neatly and flat. If necessary, shorten the tabs to get the whole thing to lie flat. This will be especially important for folding cameras.
This mask will give 15 negatives of 2¼" x 1⅝" (6 x 4.5 cm).

Adjusting the Viewfinders

Panoramic Mask
The difference in the size of the image is so small it's not worth masking the viewfinders. They are not accurate anyway. Just remember that the image will be slightly narrower along the long side (3% each side).
Small Mask for 15 images
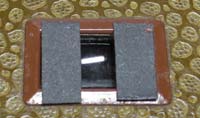
Use any method you like (temporary or permanent) to mask off ⅓ of each viewfinder window at each side as shown. Note that you will be using the camera's landscape viewfinder for portrait and vice verse.
Loading and advancing film
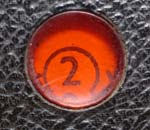
frame numbers
The red window approximately coincides with the 16 frame markers on the film backing. Films have varying types of annotation on the backing paper. So in some cases you can see the annotation through the red window and with some you cannot. Some Kodak films (e.g. Portra and Tri-X) may not show the annnotation through the red window. Ilford and Acros on the other hand do. If you have some backing paper of the type of film you will be using then check to see if the annotation will show. Or, you could re-spool the film (in the dark) using a backing paper that will show the numbers, even if you have to write the numbers on yourself in the correct position.
If the annotation will show
If the annotation will show it is probably offset so you must be slow and careful when advancing the film because you may not see the warning markers and can easily miss the frame numbers. Load the film as normal using the modified spools but try to pull out as little leader as possible to avoid exposing the film.
Then:-
- For the 'panoramic' mask use frame numbers 3,6,9,12,15 to get 5 images.
- For the 15 image mask, use frame numbers 2,3,4,->16 to get 15 images.
If the annotation will not show or you don't know

In this case you will have to rely on counting turns. A 'turn' is a 180 degree turn of the advance key or knob. Load the film. Try to pull out as little leader as possible to avoid exposing the film. Make four turns of the advance mechanism to secure the film to the spool. Close the back.
Then:-
- For the 'panoramic' mask, count 12 turns to the start of the film. There are 6 turns between frames 1 & 2 and 2 & 3 and 5 turns between frames 3 & 4 and 4 &5.
- For the 15 image mask, count 10 turns to the start of the film. Then use 2½ turns between frames 1 & 2 and 2 & 3 and two turns for the rest of the frames. You will probably get less than 15 frames
This is not an exact science and you may get some frames slightly overlapping or miss a bit at the start and the end. Of course, when winding to the start, if you see the annotation appear then revert to the methods shown above.
Possible Issues
With some cameras, for example the Agfa-Ansco PD16 Plenax, it is not possible to use a 120 feed or take up spool. This is because the 120 spools foul on the spool holders and sooner or later the 120 spool will jam. You have to reduce the diameter of the 120 spools slightly with a file or nail clippers. Unfortunately, this will make light leaks more likely. Load and unload the film in greatly subdued lighting. You could also use a 616 spool for the take up but this makes light leaks very likely so unload the film in a dark room at the time of developing. Always run through an old exposed film first to check for issues like this.
Good Luck