Restoration of Beau Brownie
Features
The Kodak Beau Brownie is a box-type camera from the 1930s with an Art Deco geometric facade made by designer Walter Dorwin Teague. It was produced between 1930 and 1933 in two versions: the No.2 Beau Brownie for 120 film and the No.2A Beau Brownie for 116 film.
Being nearly 90 years old, it is inevitable that some refurbishing needs doing. The weakest points are:-
- Dust inside the lenses and viewfinders
- Failure of the carry handle
I have never found the rotary shutter mechanism to be a problem.

Cleaning the Lenses and Viewfinders

Get together some simple tools. You will need a small screwdriver, some pliers, lots of cotton buds, some lens cleaner and possibly some all purpose glue.
The front face appears to be riveted to the camera which suggests a difficult job. However, the whole of the front of the camera can be removed to expose the inner workings without touching those rivets.
Removing the front of the camera
If you look closely below the side viewfinder and above the shutter release, you will see a small nail. There is another one in the middle on the opposite side. These must be removed.
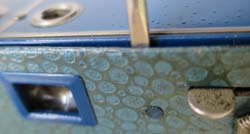
Carefully insert the small screwdriver between the outer casing and the facia and push it gently towards the nail. With a bit of wriggling, the nail can be lifted slightly. Get the pliers and remove the nails. Now lift off the facia. You may need to pry a bit.
Clean Up
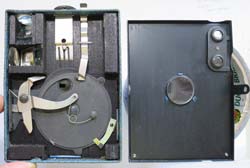
Once the front is off, you will have access to the lenses and viewfinders. Use cotton buds to gently clean the glass and mirrors with your favourite lens cleaner. Sometime you will find that one of the mirrors has come loose. Stick it back in position with general purpose glue. Be careful because the silvering is on the back of the mirror which is easily damaged. Don't fiddle! Just put a small blob of glue on each side and push into place. If the silvering is too damaged, then you could try using some pvc self adhesive mirror tiles for bathrooms. Just cut to size with hobby knife and stick to the front of the mirror glass. I used this on one of my Beau Brownies and I am pleased with the result.
through aperture
To gain access to the inside lens, pull up the time exposure tab (the small one) and hold the shutter lever down. The small aperture will allow access to the lens. Carefully clean the lens with cotton buds through the hole. Don't forget to clean the other side of the lens by accessing it from inside the back.
In the unlikely event that the rotary shutter is problematic, DO NOT OIL. These shutters run dry. First try to blow any dust from the area and clean up as much as you can with a dry cotton bud. If that fails, you might like to try dousing the pivot with lighter fluid. Keep wiping away the fluid and dirt. Be aware that the action of the shutter mechanism may at first get worse, so gentle persuasion may be needed to get it moving. Don't Panic. As the lighter fuel evaporates, it should start to work properly again. Do this in a well ventilated room.
Replace Front Plate
Simply put the front plate back in position and tap the two nails into place.
Revive Handle
A good number of Beau Brownies have their handle missing or the handle is broken. If you want one for display, make sure the handle hasn't been replaced with another type of handle. If the handle is still there but broken, you can take the handle off, unwrap the cover, use black card to fix the broken part and re-wrap and stick.
Job Done
Find out more about this camera here:- /cameras/kodak/beau-brownie-2/